Installation
Quick Client Setup
- Download the zip archive of our latest release in the Release section of our github repository or via direct download from the Download section on our web page .
- Extract it to a local folder
- Simply double click the startClient.bat, startClient.command or startClient.sh file from the bin folder, depending whether you’re using windows , mac os or linux. If Java isn’t on your PATH, then set an explicit JRE or JDK Path inside the startClient script, as shown in the commentary. If Java is not installed on your machine, you can download it here and install it
- Once the GUI opens, click the “+” sign to choose a connector
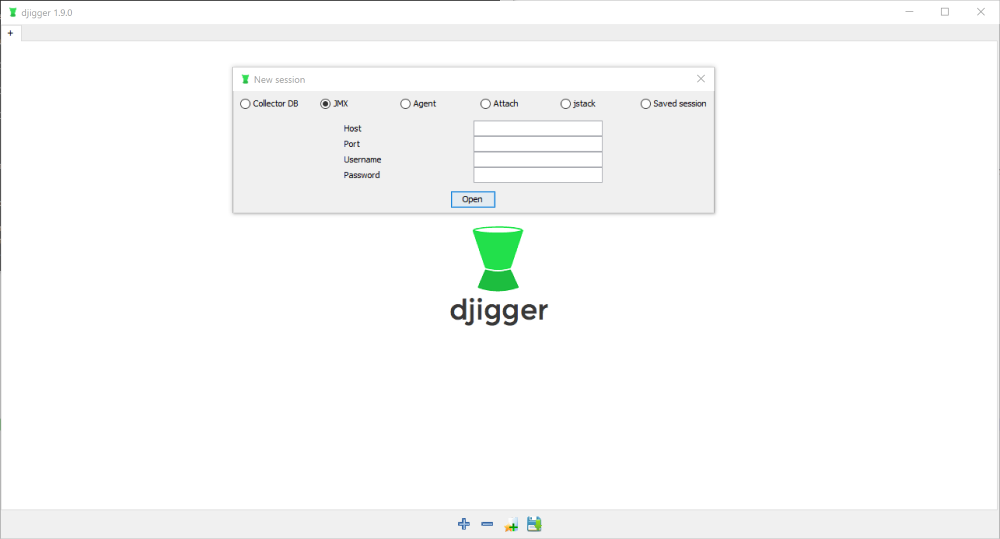
JMX mode
Regular setup (no firewall)
The following flags need to be set on the command line the remote JVM :
-Dcom.sun.management.jmxremote
-Dcom.sun.management.jmxremote.port={your_jmx_port}
-Dcom.sun.management.jmxremote.authenticate=false
-Dcom.sun.management.jmxremote.ssl=false
You can then connect to your JVM directly using djigger’s JMX connector. Just pass the network adress or dns name of the target host and the JMX port number you just configured ({your_jmx_port}). If a user and password authentication is used on the remote JVM side, you need to provide those as well.
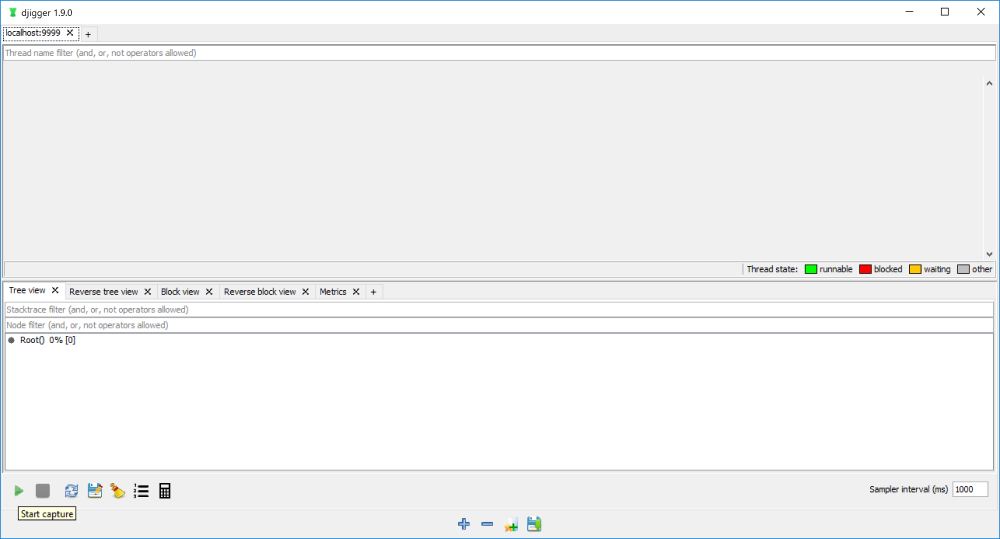
Connect and start sampling by hitting the Play button and then refresh the view by clicking the button with the circling blue arrows in the bottom left corner:
SSH Port forwarding
If you’re tunneling to your JVM port via SSH port forwarding, the following options may be required:
-Dcom.sun.management.jmxremote.rmi.port={your_jmx_port}Without this option, the RMI server port will be allocated dynamically with a good chance that traffic through this port will be blocked.
You may then start an SSH tunnel using the following type of command:
ssh {remote_user}@{remote_host} -L {a_free_local_port}:127.0.0.1:{your_jmx_port}And use localhost and *a_free_local_port *as your connection inputs of djigger in the next section.
SOCKS Proxy
In order to access your JVM using SOCKS, you may need to add the following switches to the JVM’s command line:
-Djava.rmi.server.hostname={public_interface_or_hostname}Start a SOCKS proxy using for instance Winsshterm, Putty or the following SSH syntax:
ssh -D {local_socks_proxy_port} -q -C -N {remote_user}@{remote_host}Add the following command-line switches to djigger’s start script in order to declare the proxy:
-DproxySet=true -DsocksProxyHost=127.0.0.1 -DsocksProxyPort={local_socks_proxy_port}You should now be good to go.
Debugging network issues
If your run into into Socket exceptinos such as “Connection Refused”, you may want to use a more convenient tool in order to diagnose your network path issues:
- the curl command can be used to check whether a specific network route works and whether a port is open or not is blocked or not. Here’s the syntax using a SOCKS proxy:
curl -x socks5h://localhost:{local_socks_proxy_port} {remote_host}:{your_jmx_port}- the following downloadable java program will test the JMX and MBean server connectivity at application level, which is a much deeper check: if this works, djigger’s JMX connector will work:
Download: debugJMXConnections.jar
Syntax:
java -jar debugJMXConnections.jar <hostname> <port> [optional: <user> <password>]Example with SOCKS proxy:
C:\Users\Dorian\Desktop>java -DproxySet=true -DsocksProxyHost=127.0.0.1 -DsocksProxyPort=9698 -jar debugJMXConnections.jar test-jmx 23666
Creating JMX connection to test-jmx:23666
JMX connection successful!
MBean Collector initialized. Success !
Both of these tools can be used for testing connectivity either directly, via port forwarding or via SOCKS proxy.
Agent mode
- Set the following command line flags on the target jvms and make the jar files available on the underlying host :
-javaagent:{path_djigger_folder}\djigger\agent\javaagent.jar=port:{agent_port}- Reboot the target JVM.
Process attach mode
- Add the tools.jar file from the corresponding JDK (needs to be the same version as the target JVM) to your client’s classpath. You’ll find it under jdk_1.x.y_z/lib . If you set the path to the java.exe (
/ /bin/java.exe) of your JDK in the variable “JVM_PATH”, djigger will automatically pick up the tools.jar. See example given inside the startClient script. - Start your djigger client and use the process attach connector to connect to the process you want. The available Java processes will appear in the list.
Jstack output files mode
- start your djigger client
- provide jstack-style (hotspot) formated thread dump outputs that you’ve previously gathered and dumped into one file, separated by empty lines (EOF character). You can also use the kill -3 PID command (on Windows) and Ctrl+Break key combination of the CMD window of your java process (on Windows) to issue a SIGQUIT signal which will also dump the thread stacks. Simply gather that stuff into a text file and open it via the jstack connector in the djigger client
Collector DB mode
Requirements : installing a collector (go to the “Installing a collector” section, down below)
- Click the “Collector DB” connector mode and provide the hostname on which the mongoDB instance of the collector is hosted (the client will directly connect to the mongoDB instance).
- Query your samples in the new filter found at the very top of the screen, next to the date range selector. You can query the properties that you set in the collector configuration, this is why it’s important to set your own attributes there.
For example, I can query the key values provided in the sample CSV file by executing the following query :
env=myPc and app=test and myAttributeKeyX=myAttributeValueX and ( node=1 or node=2)Collector DB setup
Installing a collector
Requirements:
- Available mongoDB binaries (mongod daemon, preferably 3.0+)
- java 6+ JRE or JDK (JDK needed for process attach)
Installation:
- You can download the mongoDB community edition here.
- You can download a JRE or JDK here.
- If the binaries aren’t accessible via your system PATH variable, set your java and mongoDB bin paths in the startMongo and startCollector scripts of the djigger/collector/bin folder
Configuring a collector
- Configure your Collector.xml file (under the conf folder) so as to set the retention policy (TTL) you want in seconds, configure your mongoDB host and point at the list of connections that you wish to set up via the following XML block. You can add as many files as you want and combine XML, JSON and CSV formats :
<connectionFiles>
  <string>conf/Connections.csv</string>
  <string>conf/Connections.xml</string>
  <string>conf/Connections.json</string>
</connectionFiles>- Configure your list of connections, either via XML or JSON format for agent connections and subscriptions or simple** flat CSV** lines if you only want JMX connections and want to work with a simple file:
- If XML or JSON: these file formats allow you to configure your store using all the available connection modes (JMX based, Agent based, process attach or JStack file watcher). You can just open the example given in the Collector.xml and Collector.json files, and defines your own connections
- If CSV: all you need is to set a few attributes on each line, representing a different connection. The columns work as follows :
hostname;jmx_port_number;jmx_user;path_to_file_containing_jmx_password;sampling_rate;attribute_key_1;attribute_value_1;attribute_key_n;attribute_value_n;- Start your mongoDB instance via the startMongo script and then start the collector (startCollector script in the /bin folder)
You should now see documents being inserted in the threaddump collection of your mongoDB instance JVM, which means that the target JVM is being monitored. You can use the Store connector of the client to query your data !